This post is long overdue. If you remember the Drafting Series I did with LiEr from Ikat Bag, this article was the last of the series that I did and I always meant to re-post it here...but things got the better of me...
So here it is in its entirety.
Now that you have a ready and wearable sloper / bodice block, you can adapt it to make any style of dresses, blouses and skirts, limited only by your imagination. If that task seem daunting to you, then use it to make commercial patterns fit your child as though you've drafted it yourself. Hey you took the time and effort to create a good-fit sloper, so you may as well make the MOST of it.
For the sake of clarity, all slopers are shown in RED in this post.
Getting Started
The first thing to do after purchasing your commercial pattern is to look at the back of the envelope or packet and study the sizing given there. If the pattern is for a dress in 2 pieces (ie. a bodice attached to a skirt) where the bodice stops at the chest level, then choose the size that is closest to the CHEST measurement of your child (not the sloper). This could be a little bit more or a little bit less than your child's actual chest measurement. If the bodice stops at waist level, then choose the size that closest to the WAIST measurement of your child. Then take note of the given age defined for that size (2T, 3T, etc). Please ignore the possibility that the defined age is not the same as your child's real age.

For this post, I am going to choose size 2 by way of example.
Next, look for the FINISHED measurements given for that size and note the differences between finished measurements and age-given measurements. In the example below, only the chest measurement will be used for horizontal fit.
finished measurement - sized measurement = ease (style and/or fit)
Write these numbers down somewhere on the back of the envelope so you will always have it on hand. The difference is the amount of ease built into the pattern. If you have included ease into your sloper (chest, waist, hip), take that much away from the ease calculated for the pattern.
22 - 21 = 1
pattern ease - ease included in your sloper
= amount of ease to add back into the pattern after adjusting
1 - 0.5 = 0.5
You must also know how much seam allowance has been added and built into the pattern. This amount is sometimes given on the back of the pattern envelope. If not, you will have to measure the pattern itself across the chest or waist and get the difference between what you've measured and the finished measurement. The difference is the seam allowance built into the pattern.

Seam allowance = 5/8" (22 5/8" - 22")
To simplify matters for you later, draw in the sewing line based on the SA determined. Sometimes the sewing line is clearly marked out on the commercial pattern. In this case, there is no need to figure out the seam allowance in the pattern.
Adjusting the Commercial Pattern
Take the commercial pattern out of the envelope and spread out all the sheets available. Look for the required size (as determined previously) and put a mark somewhere on that size pattern so you don't make a mistake later and work with the wrong one. Do this for all the required pieces.
Next, look for the printed markings where the chest, waist, hip ought to be. Depending on the design of the garment, these markings may not always be marked. A-line, tent-type dresses tend not to have these markings. I will come back to that later and explain how to adjust accordingly. Determined the seam allowance in the commercial pattern as explained above.
Dresses
I define a dress as a garment that is made up from 2 pieces - the upper torso and the skirt portion. So the following instructions work for a separate blouse and skirt pattern as well.
Upper torso - Place your sloper on the pattern matching the chest line, or waist line (this is dependent on the design of the dress). Trace out your sloper onto the pattern itself. Take the sloper away after tracing.
From the traced chest line (or waist line if you've used that) add in the amount of ease given for the chest (or waist) minus the ease from your own sloper (0.5" in the worked example above) and marked with a point on the pattern. I will call this point (A) for reference later.
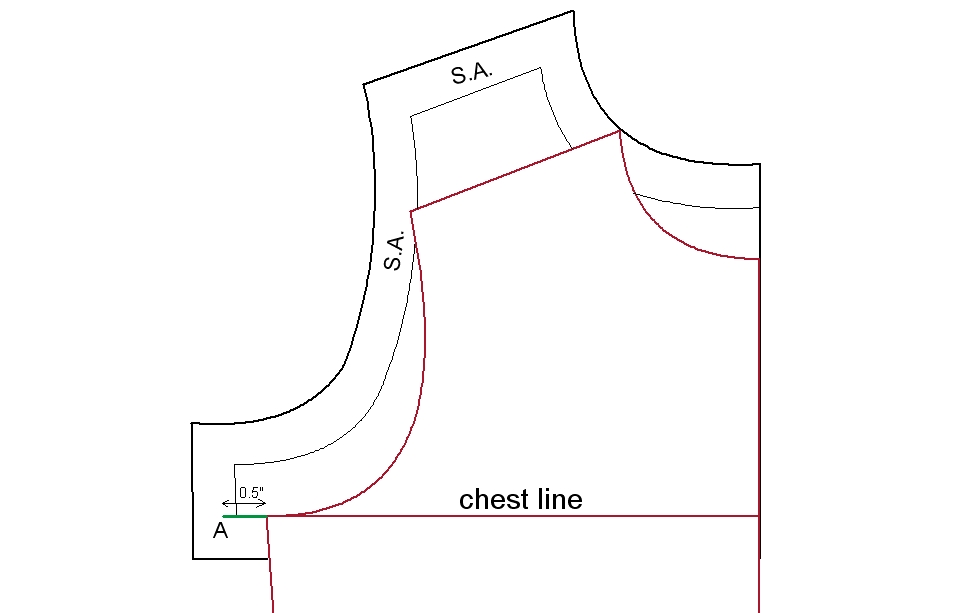
To adjust the depth of scye (armhole height), on the commercial pattern, draw a line from the base of the armscye perpendicular to the centre back line. Then adjust the pattern in the following way:
to lengthen - cut the pattern along this line. Place a piece of paper under the cut. Spread the upper portion of the cut pattern until it matches the base of the armscye of the sloper. You will need to place your sloper over the pattern again to match this point. Once you are satisfied, tape the cut pieces onto the paper underneath. Redraw the scye smoothly.

to shorten - crease the pattern along the drawn line and make a pleat according to the amount to decrease. Place the sloper over to check. Tape the pleat own and redraw the scye smoothly.

Now that the depth of scye has been adjusted, draw a line to connect point A to the base of the redrawn armscye.

You are done with the upper torso.
Skirt - the skirt portion of the skirt will start from either the chest or waist line (design dependent). You would have adjusted the pattern at the upper torso according to either one already as explained previously. Adjust the waist (chest) of the skirt like so:
A-line / gathered / pleated skirt - on the upper torso piece, measure from point A to the original chest/waist point of the pattern. Let this amount be X.

You must either add to or substract X from the chest/waist line of the skirt piece. You add if you had to increase the chest/waist line in the upper torso. Subtract if you had to decrease the chest/waist line in the upper torso.


Redraw the side seam.
You are done with the skirt portion.
Sleeve - because sleeves can vary in style, I will only explain how to adjust the depth of scye of the sleeve, which in most cases is sufficient to ensure a nice-fitting sleeve.
On the commercial pattern, draw a line to join the 2 points marking the base of the armscye.

Place your sleeve sloper over the sleeve pattern, matching at the centre line at the top of the cap. Please make sure also that they are aligned vertically as well.
If your sloper sleeve has a longer depth of scye than the pattern sleeve, remove the sloper pattern. Then slash and spread the pattern sleeve until the depth of scye is the same as that on the sloper.


Then crease and fold over along the green line to shorten the depth of scye until it matches the points marked previously.

You are done with the sleeve.
Sheaths
I define a sheath as a one-piece dress. To adjust a sheath pattern, do as you would for the upper torso of a two-piece dress. However, if it is an A-line dress, there very likely WILL NOT be any marked chest or waist lines. In this case, adjust the pattern for depth of scye only (same method as for adjusting depth of scye on upper torso, described above).
Other Areas to Consider
Shoulder slope - some shoulders are slopier or blockier than the 'standard' (whatever that is). Place your sloper over the pattern, matching at the shoulder points*. Make sure the pattern is aligned vertically as well.
If there is a significant difference between the slope on your sloper and that of the commercial pattern, then trace your shoulder slope onto the pattern paper. Smooth out the neckline if necessary.

If the difference is negligible, then don't bother adjusting, really.
*remember that on a sleeveless pattern, the shoulder point should sit higher on the shoulder line. For a sleeveless pattern, mark a point about 3/8" (1 cm) in from the original point. Use this new point as the reference when adjusting the shoulder slope.


The neck depth should be adjusted only if the pattern has a jewel (round) neckline like that on your sloper. Keep to your own neck depth.

Sheath / Skirt length - this is a no brainer, really. Just lengthen or shorten at the hem.
Design Elements to Consider
If there are gathers, pleating, smocking on the upper torso, I can only advise you to adjust for fit at the depth of scye and then make a mock up to see where else you have to alter. In some cases, finished measurements are given on the envelope back so you have a reference to work with. If so, then adjust chest/waist line of the upper torso by the amount that differs from your child's actual chest/waist measurement and that given for the chosen size. This method will also work for a skirt pattern with pleats/gathers/smocking at the waist.
Last Words
All the adjustments taken above are required for both Front and Back pieces. Adjustments are not necessary for embellishments like sashes, lace trims, binding, because you will only need to increase the amount required by only a little bit. Fabric yardage can remain the same as well because the pattern writers tend to state more than is usually required.
hi can you give me these measurements so I can draft them on a paper and put it on the fabric?
ReplyDeleteI want to stitch a dress for a 1 yr old but i dont have any of her measurements. Can you show how to draft a pattern based on standard measurements?
Ikat Bag made a very comprehensive series of posts on how to draft a sloper for a child : http://www.ikatbag.com/2010/11/drafting-epilogue.html
DeleteI'm afraid I can't give you the measurements as those are proprietary to my business. However, you can try to search for standard measurements on the internet or buy the ASTM standards from here: http://www.astm.org/Standards/D4910.htm
What a fantastic tutorial! Thank you so much for posting it.
ReplyDeletewonderful pattern making technique...welcome to our pattern designer spot www.style2designer.com
ReplyDeleteI am very grateful for detailed instructions! The http://proofreading-services.org/english.php will help you to write what you need.
ReplyDelete